Creating a Voice over Power Point Presentation

This will walk you through the steps to create a voice over power point presentation

The broad steps are these:

  • Create your power point presentation
  • Using the power point tools, record your narration. When it’s done, save your power point as a video file
  • Upload the video file to your you tube account
  • Make a link to your video

If all of that makes sense, you can quit here! The rest of this page are these steps in more detail.

Start by creating your power point. If you are creating this for a class assignment, make sure you follow the instructions carefully.

This sounds silly, but proof read your presentation. If you have words with red squiggles underneath them, you’re being reminded that the word or words may be wrong.

Once you have created your power point, save the original file where you can find it. You need a clean copy of your file in case you make any mistakes with the recording process.

Now save your file again, with a new name. Use the examples shown or pick something you will remember. You will use the 2nd file as the file you do the recording in.

Review your power point to decide what will be in the narration. What points do you need to make.

Your outline should have points you want to add to the information on each slide. Write an outline but not a script, so that you sound as natural as possible. Practice, practice, practice! You will be more comfortable – and have more ideas about what to say – if you do some ‘dry runs’ practicing what you want to say. The practice is also useful if you have time parameters. If your instructions are “at least 3 minutes but no more than 5 minutes” you need to do that practice to see how long your presentation is.

On to the actual recording.

You need a microphone of some sort. The mic on a laptop may work well for you. Make a 2-3 slide power point to test the quality and volume of the mic.

In power point, go to Slide Show and then Record Slide show.

When you’re ready to start, click on start recording from beginning

While you are recording:

  • Breath! Don’t talk too fast. If your instructor can’t understand you, that will be reflected in your grade.
  • Speak slowly and clearly
  • For the first slide, count to 3 before starting to speak
  • IMPORTANT – between slides, wait 2 seconds… power point needs time to move between slides and if you talk through the changing of the slides, you’ll lose some of your narration
  • Don’t use fancy slide transitions; you need to move your slides forward manually to make sure your recording matches the slides

Okay, you’re going to make a mess at least once. That’s part of the reason you practice.

This page doesn’t even begin to tell you how to fix a mistake. The brute force method is to simply do it again. Go back to your original file and save it again as a new file and start recording again.

Do that as many times as you need to. Especially if you’ve never done it before, you’ll need to be patient with your first time.

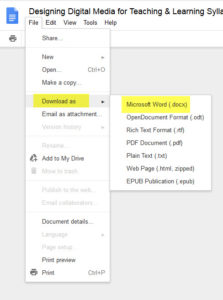
Save your file with the narration. It should be bigger than your original file since it has the narration in it.

Under File, go to Save As and look for Windows Media Video. Save your file in that format. This is the file you need for YouTube.

Test your video file on your computer. Does it look right, can you hear it? Is it what you wanted?

If not – sorry – you need to go back and do it again.

The YouTube part:

Go to Youtube.com and create an account. If you have an account, you can use that but be careful of that username. Be professional. If you need to, create an account for just homework assignments.

Okay, these are the current You Tube option. They may change but the basics should stay the same.

Once you have an account, you should have an Upload button, Click on that.

Drag your file to the upload section

If you don’t want the world to see your video, and you can if you want to, change the setting to UNLISTED. Do not change to Private – private means you have to give your instructor or classmates a password. You don’t want to mess with that.

The Unlisted option is good enough.

Wait for the upload to complete and then press Done.

From the Video Manage list, click on Share then Embed. You need this link for your course.

Copy the entire link.

This is the cool part.

In your Blackboard course, open the discussion where you need your video linked. Start a new post and then look for the HTML button. You may need to click the “more tools” double arrow to get that to show.

You’ll get a new window that pops up, paste that URL thing you got from YouTube in that box – don’t type anything else! – and then click Update.

When you’re in edit mode in the discussion, you video will not show. You get a yellow box in the discussion entry. If the yellow box is there, you’ve done it right. If you need to add notes to your presentation, sometimes it’s helpful to be in full screen mode so you have more room to work in. Click the four arrow thingy to go into full screen mode and click it again when you’re done.

Press submit.

Ta-da!

Check it out, make sure it looks right and edit as necessary. You should be all set at this point. Good job!

Google Docs and Homework

Genesee issues GMail accounts to all students, which means all students also have access to Google Docs.

All instructors do not all have access to Google Docs and, when it comes to turning in assignments, most Genesee instructors are expecting Word documents (*.docx format).

Current students can get Microsoft Office for Home Use, to be able to create *.docx documents for their instructors.

Google Docs cannot be directly uploaded to Blackboard.

Students who regularly use Google Docs should not assume instructors will accept electronic submissions in that form and should check with the instructor on what is an acceptable format.

Documents created in Google Docs can be downloaded as *.docx files.

Saving Google Doc to Word

In the File menu is an option to Download As… the first option is Microsoft Word (*.docx). The file is saved to the ‘downloads’ folder on the computer. This new document can be then uploaded to Blackboard or sent as an attachment in an email.

Winter Break Fitness Center Hours

Starting on 12/10 the fitness center hours will be the following:

Monday- Friday 11am-2pm, 3pm-6pm

Sat/Sun 12pm-2pm

*No open hours on the following dates: 12/24, 12/25, 12/31, 1/1

There will be revised fitness center hours beginning the week of 1/14/19 which will be sent out closer to that date.

Questions can be directed to the Athletics Office

myGCC? What’s that?

You may have noticed at the top of the college web site, that the link to Genesis now says “myGCC/Genesis”

mygcc link

And, in fact, that the familiar Genesis logo has been replaced.

Genesis logo

has been replaced by:

myGCC logo

Genesis has been our portal for a number of years now, and it’s more than time to update the information, add new information and retire some things that really are no longer important.

The new look is also more accessible to users who need to use screen readers or assistive technology to use our web site.

Students should see new pages inside Genesis now, faculty will see new information in July and all other employees will see new information starting in August.

We’d love to hear from you, to tell us what you think. Please send an email to helpdesk@genesee.edu and tell us what you like, what you don’t like, what’s missing, what we could do better!

Student Art Exhibit – May 3 – 20

Digital Art and Photography students at Genesee Community College have spent the year preparing works to be featured in the College’s juried student art exhibit which will be on display in the Rosalie “Roz” Steiner Art Gallery at GCC’s Batavia Campus from May 3 – May 20, 2018. The entire community is encouraged to come and enjoy this spectacular celebration of student work.

Art Too theme logo

The student exhibit this year has been created under the theme #ARTtoo. Digital art and photography are sometimes overlooked as forms of fine art. Often when people think of ‘fine art’ they imagine paintings, drawings or sculptures overlooking masterfully created work that employs technology. The #ARTtoo title reminds viewers that photography and digital art are very real forms of fine art too. Around 40 students entered over 300 works for consideration, and only around 70 pieces will be displayed in the gallery.

Opening Receptions for the #ARTtoo exhibit will be held on ThursdayMay 3, 2018 at 12:30 p.m. and 5 p.m. Artistic awards will be announced at the evening reception beginning at 7 p.m. in the Gallery.

This exhibit marks the second juried student exhibit at GCC. The juror this year was Nigel Maister, an artist and a collector who was born in South Africa. Maister currently serves as the Russel and Ruth Peck Artistic Director of the University of Rochester’s International Theatre Program. Maister trained as an actor and director and he earned a Master of Fine Arts from Carnegie Mellon University.

In the Photography category, Maister will award cash prizes ranging from $75 to $150 for Digital, Film, Pinhole, Best Concept and Best Overall Photography totaling $475 in prizes.

In the Digital Art category, Maister will award cash prizes ranging from $75 to $150 for Illustration, Typography, Promotional Design, Dream Imagery, Media (video and animation), Best Concept and Best Overall Digital Art totaling $625 in prizes.

The Roz Steiner Art Gallery is open to the public Monday – Friday from 10 a.m. to 2 p.m. and during special events as published at www.genesee.edu/campuslife/arts or on Facebook using https://www.facebook.com/gccgallery(link is external). Admission to the Gallery is always free.

For more information, contact Gallery Coordinator Mary Jo Whitman at (585) 343-0055 ext. 6490, or via email: mjwhitman@genesee.edu(link sends e-mail)

Resume & Cover Letter Writing Workshop

Career Services Presents… 

Resume & Cover Letter Writing Workshop
Tuesday, April 17th
12:30-1:30
G200, Student Success Center, Batavia Campus

Impressing an employer with your resume and cover letter while they are in a stack of 100 others can be a challenge. This workshop will guide you on the proper format and content of a resume and cover letter to give you the best shot at being granted a personal interview.

ATTEND VIRTUALLY: Use Blackboard Collaborate!

Use the following link to join our session from your mobile phone or computer: https://us.bbcollab.com/guest/eb40505e244147d1aab95b61a4222318

Supported by: Phi Theta Kappa
Register through: Purple Briefcase

Contribute to the 2018-2023 GCC Strategic Plan

As you may know, we are wrapping up the information-gathering portion of our work on the 2018-2013 Strategic Plan and we could use a bit more student feedback.

All students are urged to contribute!

https://www.genesee.edu/home/about/administration/strategic-planning-initiative/

If you have any questions please contact us.

Best wishes for the new semester and the new year!

Tim Tomczak (tptomczak@genesee.edu) and Craig Lamb (crlamb@genesee.edu)
Strategic Plan Steering Committee Co-Chairs

Students! Need a GCC ID?

If you do, here are some things to know:

  • You MUST already be registered for Spring classes
  • You MUST bring your GCC ID number (aka your 800#)and a form of photo ID (driver’s license, current high school ID, passport, etc.)

Come to the Student Activities Office on the Batavia Campus to get an ID printed.

SA is open 8:30 am to 4:30 pm this week (1/8-1/12). The office is closed this weekend, as well as for the MLK holiday on Monday. The office re-opens on Tuesday, January 15 at 8:30 am.

Taking classes at a campus center? Talk to the staff there to get your picture taken and they will help you get an ID card!